
Hello, darlings! Amira here, from my kitchen to yours. Today, I’m absolutely bursting with excitement to share a recipe that’s become a staple in our home – Crispy Air Fryer Panko Chicken Thighs. This isn’t just any chicken recipe; it’s a little bundle of joy, ready in minutes, and guaranteed to bring smiles to your dinner table. Trust me, once you try this, you’ll wonder where it’s been all your life!
I remember when I first started experimenting with air frying. I was a bit skeptical, to be honest. But the first time I made these chicken thighs, I was completely sold. The outside is perfectly crispy, the inside is juicy and tender, and the whole process is so incredibly simple. It’s the kind of recipe that makes you feel like a kitchen wizard, even on the busiest weeknights. So, let’s dive in, shall we? I can’t wait for you to experience the magic of these air fryer chicken thighs!
Why You’ll Absolutely Love This Recipe
Oh, my dears, there are so many reasons to fall head-over-heels for these Crispy Air Fryer Panko Chicken Thighs. It’s more than just a meal; it’s a hug on a plate! Here’s why I know you’ll adore them:
- Quick and Easy: From prep to plate, you’re looking at under 30 minutes. Perfect for those hectic evenings when you need a delicious meal in a flash.
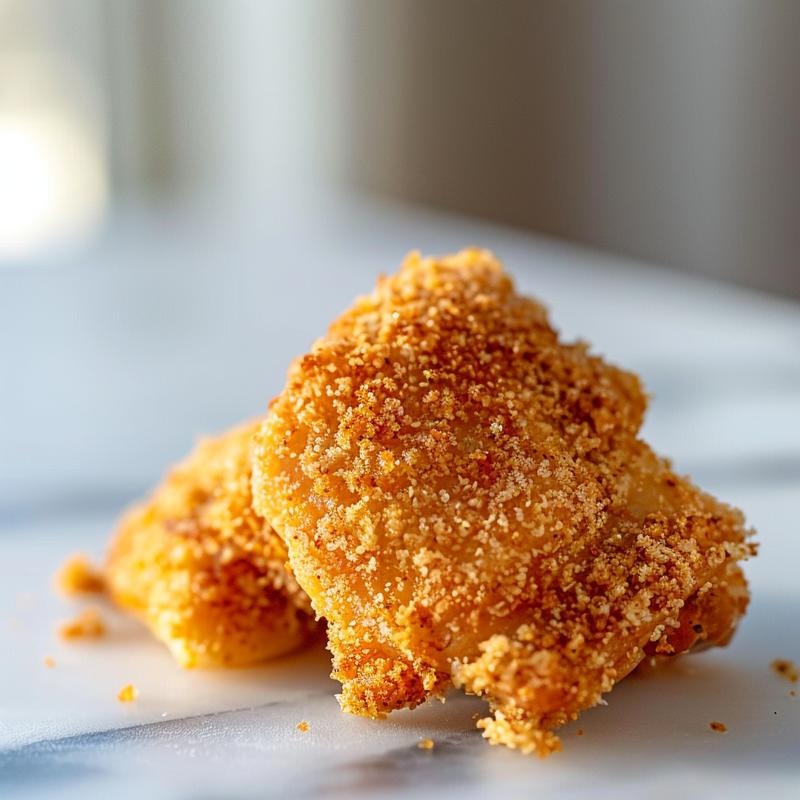
- Incredibly Crispy: The air fryer creates a beautiful, golden-brown crust that’s irresistibly crunchy. No more soggy chicken!
- Juicy and Tender: The chicken thighs stay incredibly moist on the inside, thanks to the air fryer’s even cooking.
- Simple Ingredients: You probably have most of these ingredients in your pantry already. No need for fancy, hard-to-find items.
- Versatile: Serve these chicken thighs with your favorite sides – rice, roasted vegetables, salad, or even pasta. The possibilities are endless! Thinking about making some chicken pasta with this? Oh, the possibilities!
- Healthier Option: Air frying uses significantly less oil than traditional frying, making this a guilt-free indulgence.
Honestly, this dish that is so easy, it’s practically foolproof. It’s one of those recipes that I make when I want something comforting and satisfying, without spending hours in the kitchen. And the best part? Everyone in my family loves it, from the little ones to the grown-ups. It’s a true crowd-pleaser!
Ingredients: Simple and Flavorful
Here’s what you’ll need to create these little pockets of joy. Remember, quality ingredients make all the difference, so choose the best you can find. From my heart to your hands, let’s gather our ingredients:
- 4 boneless, skinless chicken thighs: The star of the show! Make sure they’re roughly the same size for even cooking.
- 1 cup panko breadcrumbs: These are the secret to the ultimate crispy coating. Panko breadcrumbs are lighter and airier than regular breadcrumbs, resulting in a superior crunch.
- 2 large eggs, beaten: These help the panko adhere to the chicken, creating a lovely golden crust.
- ½ cup all-purpose flour: This provides a base for the coating and helps the chicken brown beautifully.
- 1 teaspoon garlic powder: Adds a savory depth of flavor that complements the chicken perfectly.
- 1 teaspoon paprika (smoked or sweet): Paprika not only adds flavor but also gives the chicken a beautiful reddish hue. I personally love smoked paprika for a little extra smokiness, but sweet paprika works just as well.
- ½ teaspoon salt: Enhances the natural flavors of the chicken and other ingredients.
- ¼ teaspoon black pepper: Adds a touch of spice and complexity.
- Olive oil spray (for air fryer): This helps the chicken crisp up even more and prevents it from sticking to the air fryer basket.
See? Nothing too complicated. Just simple, wholesome ingredients that come together to create something truly special. And remember, cooking is all about experimenting and making it your own. Feel free to adjust the seasonings to your liking. A pinch of cayenne pepper for a little heat? A dash of Italian seasoning for an herby twist? Go for it, my dear!
Step-by-Step Instructions: From My Kitchen to Yours
Now, let’s get cooking! Follow these simple steps, and you’ll have perfectly crispy, juicy chicken thighs in no time. Don’t worry, I’ll be with you every step of the way. This recipe is as easy as can be!
- Step 1: Prep the Chicken: Pat the chicken thighs dry with paper towels. This helps the coating stick better and reduces moisture that could steam the chicken instead of crisping it.
- Step 2: Season the Flour: In a shallow bowl, combine the flour, garlic powder, paprika, salt, and pepper. This seasoned flour will add an extra layer of flavor to the coating.
- Step 3: Dredge the Chicken: Set up a dredging station with three bowls: one with the seasoned flour, one with the beaten eggs, and one with panko breadcrumbs. First, coat each chicken thigh in the flour, then dip into the egg, and finally press into the panko until fully coated.
- Step 4: Preheat and Prep the Air Fryer: Preheat your air fryer to 400°F (200°C) for 3–5 minutes. Lightly spray the air fryer basket with olive oil to prevent sticking.
- Step 5: Air Fry the Chicken: Place the chicken thighs in a single layer in the air fryer basket. Lightly spray the tops with olive oil spray. Cook at 400°F (200°C) for 10 minutes, flip, spray again, and cook for another 8–10 minutes or until golden and crispy. Internal temperature should reach 165°F (74°C).
- Step 6: Rest and Serve: Let the chicken rest for a couple of minutes before slicing or serving. This helps retain the juices and keeps the crust crisp.
And there you have it! Perfectly crispy, juicy chicken thighs, ready to be devoured. See how easy that was? I told you it was foolproof! Now, let’s talk about some tips and tricks to make sure your chicken thighs are always a success.
Pro Tips for Perfectly Crispy Chicken
Here are a few of my tried-and-true tips to ensure your chicken thighs are always cooked to perfection:
- Don’t overcrowd the air fryer: Cook the chicken in batches if necessary. Overcrowding will prevent the chicken from crisping properly.
- Use a meat thermometer: The best way to ensure the chicken is cooked through is to use a meat thermometer. Insert it into the thickest part of the thigh, and make sure it reaches 165°F (74°C).
- Spray with olive oil: Don’t skip the olive oil spray! This is essential for achieving that golden-brown, crispy crust.
- Preheat the air fryer: Preheating ensures that the air fryer is at the correct temperature when you add the chicken, which helps it cook evenly.
- Pat the chicken dry: Removing excess moisture from the chicken thighs is crucial for a crispy coating.
These little tips can make a big difference in the final result. Trust me, a little extra effort goes a long way when it comes to achieving that perfect crispy texture and juicy interior.
Common Mistakes to Avoid
We all make mistakes in the kitchen, darling, but knowing what to avoid can save you from a culinary disaster. Here are a few common pitfalls to watch out for when making these air fryer chicken thighs:
- Not patting the chicken dry: This is the number one mistake! Excess moisture will prevent the coating from sticking and will result in soggy chicken.
- Overcrowding the air fryer: As mentioned earlier, overcrowding will prevent the chicken from crisping properly. Cook in batches if necessary.
- Not preheating the air fryer: Preheating is essential for even cooking.
- Using regular breadcrumbs instead of panko: Panko breadcrumbs are lighter and airier, resulting in a crispier coating. Regular breadcrumbs will be heavier and can result in a less desirable texture.
- Not checking the internal temperature: Undercooked chicken is a no-no! Always use a meat thermometer to ensure the chicken reaches 165°F (74°C).
Learning from mistakes is part of the cooking journey. Don’t be discouraged if your first attempt isn’t perfect. Keep practicing, and you’ll be a pro in no time!
Variations to Spice Things Up
One of the things I love most about this recipe is how versatile it is. Feel free to get creative and experiment with different flavors and ingredients. Here are a few ideas to get you started:
- Spicy Chicken Thighs: Add a pinch of cayenne pepper or a dash of hot sauce to the flour mixture for a little kick.
- Italian Chicken Thighs: Add a teaspoon of Italian seasoning to the flour mixture. You can also add a sprinkle of Parmesan cheese to the panko breadcrumbs.
- Lemon Herb Chicken Thighs: Add the zest of one lemon and a tablespoon of chopped fresh herbs (such as parsley, thyme, or rosemary) to the flour mixture.
- Honey Garlic Chicken Thighs: After air frying, brush the chicken thighs with a mixture of honey and minced garlic.
- Gluten-Free Chicken Thighs: Use gluten free all-purpose flour and gluten free panko breadcrumbs.
Don’t be afraid to think outside the box and come up with your own unique variations! Cooking should be fun and creative, so let your imagination run wild.
Storage and Reheating Instructions
If you happen to have any leftovers (which is rare in my house!), here’s how to store and reheat them:
- Storage: Store the cooked chicken thighs in an airtight container in the refrigerator for up to 3-4 days.
- Reheating: The best way to reheat the chicken thighs is in the air fryer. Preheat the air fryer to 350°F (175°C) and cook for 5-7 minutes, or until heated through. You can also reheat them in the oven at 350°F (175°C) for about 10 minutes.
Reheating in the air fryer will help to maintain the crispy texture. Microwaving is not recommended, as it can make the chicken soggy.
Frequently Asked Questions (FAQ)
Here are some frequently asked questions about these Crispy Air Fryer Panko Chicken Thighs:
- Can I use bone-in chicken thighs?: Yes, but you’ll need to adjust the cooking time. Bone-in chicken thighs will take longer to cook than boneless, skinless thighs.
- Can I use chicken breasts instead of chicken thighs?: Yes, but chicken breasts tend to dry out more easily. If using chicken breasts, be sure to pat them dry thoroughly and don’t overcook them.
- Can I make this recipe ahead of time?: You can prep the chicken ahead of time by dredging it in the flour, egg, and panko breadcrumbs. Store the breaded chicken in the refrigerator for up to 24 hours before air frying.
- What if I don’t have an air fryer?: You can bake the chicken thighs in the oven at 400°F (200°C) for 20-25 minutes, or until golden brown and cooked through.
- Can I freeze these chicken thighs?: Yes, you can freeze the cooked chicken thighs. Wrap them individually in plastic wrap and then place them in a freezer bag. They can be stored in the freezer for up to 2-3 months.
If you have any other questions, feel free to ask in the comments below. I’m always happy to help!
Serving Suggestions: Complete the Meal
These Crispy Air Fryer Panko Chicken Thighs are incredibly versatile and can be served with a variety of sides. Here are a few of my favorite serving suggestions:
- Roasted Vegetables: Serve with roasted broccoli, carrots, or Brussels sprouts for a healthy and delicious meal.
- Rice or Quinoa: A simple side of rice or quinoa is a great way to soak up the delicious juices from the chicken.
- Salad: A fresh green salad with a light vinaigrette is a perfect complement to the crispy chicken.
- Mashed Potatoes: Creamy mashed potatoes are always a comforting and satisfying side.
- Pasta: Toss the chicken thighs with your favorite pasta and sauce for a complete meal. A simple tomato sauce or a creamy Alfredo sauce would be delicious. You could even try a sun dried tomato pesto!
No matter how you choose to serve them, these Crispy Air Fryer Panko Chicken Thighs are sure to be a hit. They’re the perfect combination of crispy, juicy, and flavorful, and they’re so easy to make. So, what are you waiting for? Get in the kitchen and start cooking! You know, if you add some sun dried tomatoes to a cream sauce, this could easily become “marry me chicken“! This delightful dish is perfect for any occasion.
From my kitchen to yours, with love. I hope you enjoy this recipe as much as we do! Remember, cooking is an act of love, so put your heart into it, and you’ll create something truly special. Bon appétit, my dears!
I am confident that whether you are planning to cook for your loved ones, or yourself, you will want to try this. Here are some good chicken thigh pasta recipes to try!

Crispy Air Fryer Panko Chicken Thighs
Ingredients
Method
- Step 1: Prep the Chicken: Pat the chicken thighs dry with paper towels.
- Step 2: Season the Flour: Combine the flour, garlic powder, paprika, salt, and pepper in a shallow bowl.
- Step 3: Dredge the Chicken: Coat each chicken thigh in flour, then egg, and finally panko.
- Step 4: Preheat and Prep the Air Fryer: Preheat air fryer to 400°F (200°C) and spray the basket with olive oil.
- Step 5: Air Fry the Chicken: Place chicken in the air fryer, spray with oil, and cook for 10 minutes. Flip, spray again, and cook for another 8–10 minutes until golden and internal temperature reaches 165°F (74°C).
- Step 6: Rest and Serve: Let the chicken rest for a couple of minutes before slicing or serving.
Notes
Loved this recipe? Save it to your favorite Pinterest board so you can easily find it later! ✨
